Creating your own board
It happens frequently to me that I want to do an Arduino project and that the extra chips I need do not fit on a prototype shield. I sometimes use a PCB that fits onto an Arduino Uno that only contains pads to fit componetns onto. Like this one from AliExpress : Prototype PCB board for Arduino Uno. So when this happens I have to lay out my chips on a separate prototyping board. For one-offs and less important projects I like to use prototyping boards that have tracks in the same layout as my breadboard. That makes transfering the breadboard setup to the PCB a lot easier. But of courde I still need to be able to program the Atmega328 chip even though it is not on the Arduino UNO board. To do this I take a brand new Atmega328 chip, burn the bootloader on it so I can then download the application over an FTDI connector. In my programming environment it does not make any difference to using a regular Arduino board. I click the same download button and the grogram is downloaded over the FTDI connector to my DIY Arduino board.
In the article below I explain how I do this.
Installing the Minicore board
A programmer who calls himself MCUdude has written bootlooders for the most popular AVR micro controllers. We will be using the MiniCore bootloader for the Atmega328 which can be found on Github. On his Github page you can find all the information on how to install the boards using the Board Manager. It's basically just a matter of starting the Arduino IDE, opening the File -> Preferences menu item and entering the URL https://mcudude.github.io/MiniCore/package_MCUdude_MiniCore_index.json in the Additional Boards Manager URLs page. Once that is done you can go to the Board Manager and install the MiniCote boards.


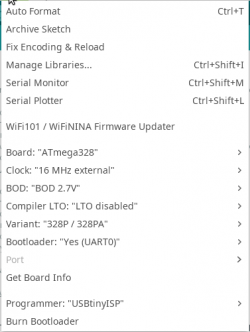
Now that the board is installed we can select the board. In the Arduino IDE go to the Tools Menu, open the boards: menu item and select the Arduino328 board. Leave the menu items that apear in the Tools menu on their default value.
Putting the bootloader on the Atmega328
I order to be able to program the Atmega328 over a serial or USB port we need a bootloader on the chip. The bootloader system makes the Atmega chip to go into programming mode when the reset pin is pulled low when the chip is started up. When the Atmega328 is in programming mode we can send the new application to it using an FTDI connector, the chip is rebooted with the reset pin high and the new application starts up. It's an easy and convenient system. We just need to get the bootloader onto the microcontroller chip. There are basically two ways to do this:
- Either you use an Arduino as an ISP
- You use a ICSP programmer like the USBTinyISP
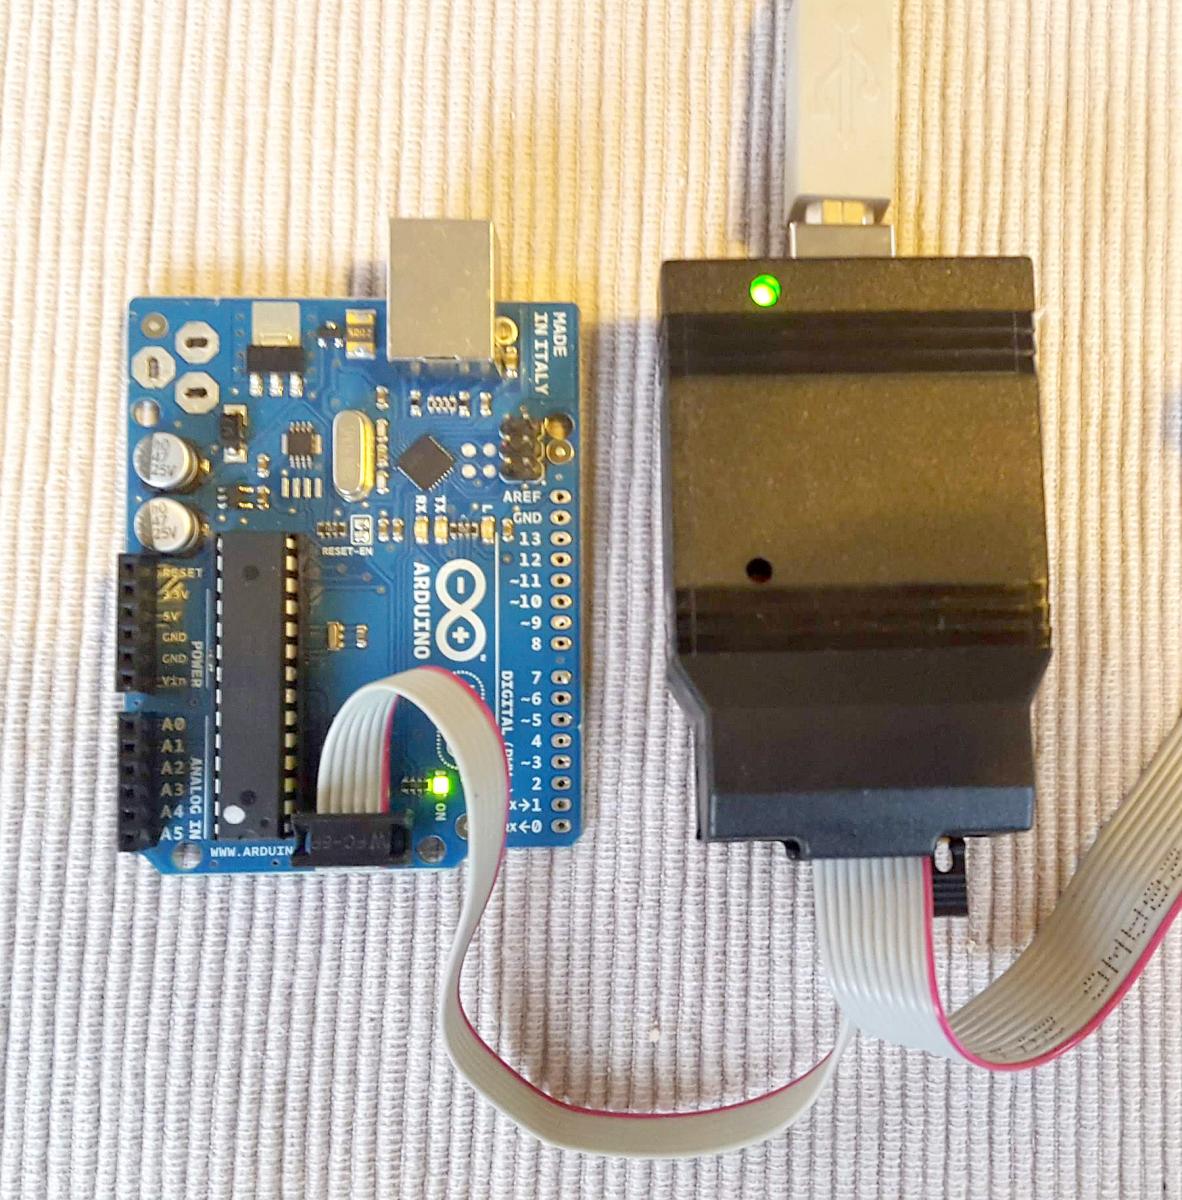
In the first case you need an Arduino UNO, put the new Atmega328 chip on a breadboard and hook everything up. You then burn the ArduinoISP program to the Arduino UNO board and use that as a programmer. It's pretty combersome, needs a free Arduino UNO board and a free breadboard. On top of that it's pretty annoying to wire everything up just ot put the bootloader on a the chip. You just want to drop your brand new Atmega328 into a board, hook it up to your computer, burn the bootloader and get on with your project. That's why I use an USBTinyISP and an old Arduino board.The Arduino UNO board you see in the picture is an old one that accidentally got hooked up to 12V on the USB port. This fried the part that takes care of the USB connection, but left the rest of the board OK. I scavenged a few parts from this board already. The main parts that are needed are the IC holder, the cristal, a few capacirors and the 6 pin ICSP connector. I keep this Arduino hooked up to the USBTinyISP, the black box in the picture, in case I need to program an Atnega328. If you don't have an old Arduino laying around you can get a board with a ZIF socket and use it in exactly the same way.Now that the programmer is hooked up and the new Atmega328 chip is plugged into the board we kan burn the bootloader. To do this we must first select the USBTinyAVR als the programmer in the Tools -> Programmer menu item. Then select Burn Bootloader in the Tools menu. You will see a message saying Burning bootloader to I/O Board (this may take a minute).... Wait for the programmer to do its work untill you will see the message Done burning bootloader.. The LED on pin 13 of the Arduino board will flash twice repeadedly. Congratulations, the Atmega328 chip is now ready to be put on your breadboard or prototyping board.
Programming the Atmega328 using an FTDI adapter
Now that the bootloader is on the Atmega328 chip you can wire up the breadboard Arduino. Use the very clear explanation on the Arduino site to build it on a breadboard. Just skip the part about the ICSP connector (the connector with two rows of three pins). Double check your connections and connect the USB cabel to your computer. The FTDI connector should light up and if you have an LED connected to pin D13 it will start to blink.Select the COM port of the FTDI adapter in the Arduino IDE and download your sketch. Downloading your sketch must be exactly the same as using your regular Arduino UNO (or similar) board.